Unravelling Knitwear for Cosplay
So! Now you have a basic vocabulary around what makes up a knit garment. Hopefully this means that if you see a piece of drawn knitwear, you might be able to get an idea of what the designer was going for. The actual idea of knitting something from scratch might still be a little far off, so let's break down a couple of examples of knitwear in games/anime, and chat about how you could approach them if you want to modify something existing to work.
Working with prexisting fabrics
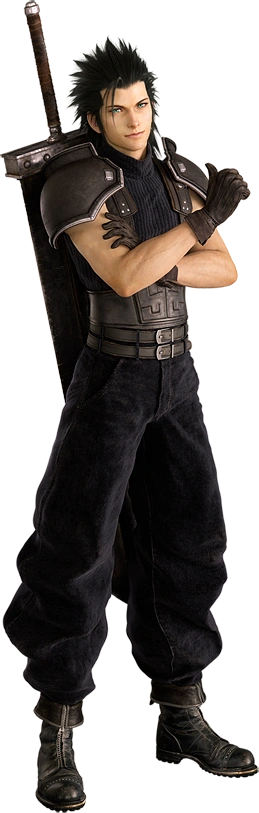
Cloud Strife's iconic turtleneck is one of my favourite examples of knitwear in a game, because it's super easy to dismiss as a plain, stockinette turtleneck. Those are easy, you can buy one on ebay, cut off the sleeves, and have an excellent replica that looks pretty dang close the the source material.
The fun part is when you notice that his turtleneck isn't made from a stockinette fabric - it's a rib! Tight knit, but it explains the line pattern on it that shows up in a lot of the official art of him. How many stitches are in the knit columns verses the purl columns changes from reference to reference. I've made his turtleneck twice (pictured once, and both times I've worked with a store bought knit fabric and a sewing machine equipped with a twin needle. The twin needle allows for two rows of stitches to be sewn at the same time, with the same bottom thread that pushes the fabric to make little ridges. I've only ever used twin needles that don't have much of a gap between them, but they come in a range of widths! They could be used to make a range of imitation ribs!
Final Fantasy loves this style of ribbing - you also see it with Zack and Yuffie.
/cdn.vox-cdn.com/uploads/chorus_image/image/69452164/ff7rintergrade_aprilscreenshot_01_EeZEkS9e0.0.jpg)
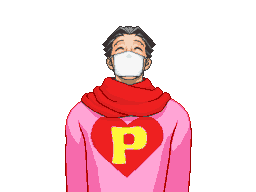
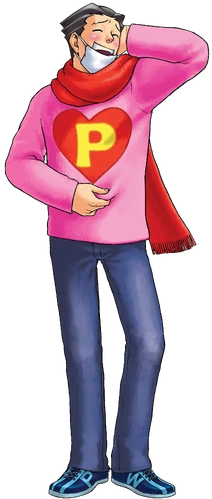
Phoenix Wright has two pieces of knitwear associated with him, a chunky pink sweater with a heart motif, and a simple red fringed scarf that goes with it. A pretty common way to approach his sweater is buying a pre-made jumper and painting the heart and 'P' (or 'RYU') on it. This method also works with knit sweaters, though painting them can be a little big of a pain (reduction of stretch/risk of paint cracking - don't ask me how I learnt this lesson). Appliqueing on the heart and 'P'/'RYU' is also a really fun way to go about it, and helps to add the 'home-made' aspect of it from the game itself. The applique could be made from stacked pieces of felt/fleece, or knit with the 'P' included as the pattern via Intarsia Colorwork or duplicate stitch after the fact. You'd then be able to place with a lot of fun ways of application - do you want to just attach the piece with a running stitch? Satin stitch? A blanket stitch? It's a simple way that means you've got a lot of opportunities to play around with it.
As for Phoenix's scarf, it's overall pretty simple aside from the short fringe at the end of it. You can find scarves like it in pretty much any basic clothing store once the weather starts getting colder, though you may need to add the fringe yourself. If that's the case, I'd get a yarn that matches the scarf closely in colour in a medium weight (probably looking at a 4-6 ply yarn) and cut it up into a bunch of strands about 10-12 cm long. Fold them in half so there's a loop, thread a crochet hook through the short edge of the scarf, and use the hook to pull the loop through to the other side of the scarf. You'll then be able to tuck the two tails through the loop, and bam, you've got the start of a fringe*!
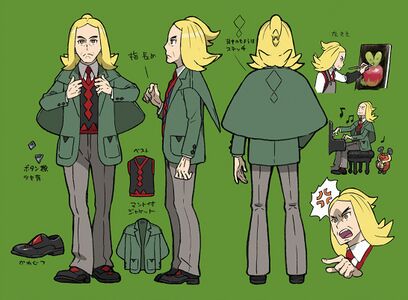
Hassel's another sweater guy (there are a lot of them in this section! I didn't realise how many until I got to this point), and his sweater vest has a couple of fun elements! There's the black base, red trimming at the neckline, armholes, and hem, and matching red details extending from the neckline and hem. It's distinct because while the red is largely in places I'd associate with ribbing, it lacks the lines generally used for stylisation purposes. It's another piece you could duplicate stitch the details of, but I think the amount you'd need to do would be, well, a hassle (ha!). I'd approach it by buying a base black sweater/sweater vest, cut off the excess, and use knit fabric to replace the hem and trim the arm holes, as well as a facing for the neckline (including the details for the front) and appliques for the bottom. While I suggested visible stitching methods for Phoenix's applique, Hassel's would probably be better served by an invisible stitch - he's a little bit more polished looking and it'd fit that aesthetic better.
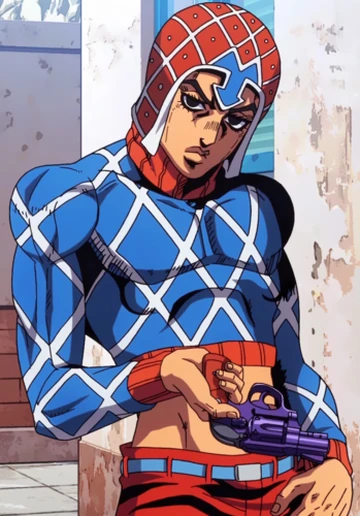
I've had a number of friends cosplay Mista and Diego from Jojo'd Bizarre Adventure who tackled their sweaters in the same way - buying a knit fabric, and then carefully machine-applying bias binding onto it to make their funky stripy patterns. Super effective, looks fantastic, but does also great a garment that's a pain and a half to get in and out of. To try and alleviate this difficulty, I'd consider using a duplicate stitch on a pre-existing fabric/sweater for them to create the criss-cross. The duplicate stitch is where you embroider a pattern onto a fabric by stitching over the 'V's that make up stockinette. For the case of working with a pre-existing fabric, I'd be looking to work with 2-3 ply yarn. It's not a super speedy method, but it'd look fairly seamless. A speedier, but less subtle method that might work is surface crochet. This technique is where you use a crochet hook to chain in between stitches* on a preexisting fabric/garment. The ribbing on both these sweaters would be prebought, or custom made ala the method I outlined for the ribbing of Cloud's turtleneck, and then sewn on where needed.
Hitomi from AITSF is another knit costume I've made by modifying an existing piece. I bought an oversized cream cable knit sweater dress with a very high turtleneck as my base piece. I cut the neckline relatively to shape, chopped the turtle neck portion into 4, seamed them together, and then sewed the new neckline in place. In retrospect, threading elastic through the top of the neckline would have been a good idea to help with the stability of the dress, but hey, it was a new to me technique!
While I bought a cabled sweater when I made her, in a brief scope out I just did, it's tricky to find anything similar available at the moment. Lots of cream sweater dresses, but they're of a simpler style. If you were to use one of them, you'd need to fake the various cables, which I would do by making I cord and sewing it to a pre-existing sweater. I cord is a really versatile knitting technique where you knit 3 or more stitches, then slide the stitches back to the starting point and knitting another row, rather than knitting back and forth. It creates a plush looking textile with a decent amount of stretch. The amount of stitches you knit impact how wide your cord ends up, so for Hitomi you'd need to make up a number of different widths. If you don't want to knit the i cord, there are also options for crocheting it, as well as a number devices you could use instead for at least some widths!
Knitting from scratch
Okay so! That's a lot about ways you can get playful in your approach to making knitted garments if you don't want to commit to knitting (or crocheting) a full garment, but maybe you're like me and will see something like this and immediately go and buy a set of needles and more yarn than a single person will ever use. Lets talk through a couple of examples of knits that'd be easier to make by knitting them rather than trying to modify something that already exists.
Saga from Alan Wake 2 has a pretty simple colourwork yoke sweater, designed by the fantastic Minttu Wikberg. The team behind the game also did something pretty unheard of and released an official pattern for it - not just the colourwork section but a full sweater pattern! While the pattern text is short, it's written with beginners to knitting in mind, and the worsted (10 ply) weight means that it'd be something that works up relatively quickly. The pattern itself could be modified easily for any type of yoked sweater, as long as you feel confident in the idea of charting (that is, making the pixel art style design that'll be knit) the colour work.
Okay, I know I said earlier that ribbing is the devil, but please hear me out. Much like Cloud's turtleneck, Ada Wong's dress in the Resident Evil 4 remake's another case of an entirely ribbed garment. Featuring a folded turtleneck, set in sleeves, and a fair deal of shaping, all in 1 by 1 rib (so a pattern of 1 knit stitch, 1 purl stitch, and so on), this is the sort of project that'd probably take a year to knit, but oh it would be satisfying. I'd approach it as a bottom up knit (starting to knit it from the hem of the dress and working upwards) to allow for a bit of ease figuring out where increases and decreases need to occur - and the same goes for the sleeves. They'd need to be knit separately from the body, and sewn on once everything is put together. I'd be looking at knitting this on a size 2.5mm* or smaller needle, with a 3-5 ply yarn*. It's nowhere near a practical project, but it'd be a fun one!
Thinking of impractical projects, Grusha's scarf is a hoot and a half, and such a silly, clever design. It's easiest to breakdown when you think of it in two pieces, the pokeball and the scarf itself. There are a number of patterns kicking around for pokeballs (thank you to the mums designing stuff with the intention of getting their kids into things they liked when they were young), but like Ada's dress, I'd probably look at knitting it on a smaller knitting needle to help maintain the shape. Alternatively, it could be crocheted, which'd produce an orb at less risk of stuffing showing at the joins of colours.
For the scarf portion, I'd look at working with a 6-8 ply yarn, and working with needles 3.25mm or larger. I'd start knitting it from the end with the fringe, and for an easier experience I'd start by knitting a handful of rows in red, before introducing the blue to be knit using Intarsia methods. This would leave a kind of messy underside, and has the risk of the piece curling, but you could sew a lining to it which would solve these issues and help bulk out the scarf. Otherwise, you could double knit the scarf section, which is where you knit the wrong at the same time as the right side, resulting in a reversible pattern. I'd probably do a little bit of short row shaping around the midpoint of the scarf to create the dip you see where the pokeball joins. The pokeball can be pretty easily sewn to the pointier end. Fringe would be able to be looped in in the same way I mention with Phoenix's scarf.
Escha and her very silly bolero from the Atelier series are what initially sparked this project - a friend is making her, and he and I had a lot of back and forth while he was in the planning stages since his knitting experience is pretty minimal. Escha's bolero features a very chunky rib, cables, alternating stockinette and garter sections, and bobbles (which I'd consider a lace technique! Big win for the me who didn't think I'd get to talk about lace), as well as a gradient dye job. I'd probably knit her out of something with a high acrylic content to minimise the difficulty of the dye work, but an acid bath would be doable as the gradient is primarily on the sleeves.
For Escha bolero, I would start out by knitting the sleeves, bottom up to get a good feel of the knit to purl ratio on ribbing. I'd lean towards knitting the sleeves in the round, just to try and reduce the fiddlyness of the bobbles (watch this space, I might make an effort to chart them because theyre just SO delightful)